
Hallways: New Lights, Outlets and Switches
Getting Electricals Done
New grounded outlets, aged-bronze switch plates, and Mission-style fixtures bring the hallways and stairwell into a new era.

Replacing the Hallway Switches and Outlets
I went with brown switches and outlets...

We went with Imperial Bead Aged Bronze set from AmerTac. They didn't score great on Amazon (3.5 I think) but they're fantastic. A nice solid metal and the finish is gorgeous. Of course, they went on after the switches and outlets were replaced. I'm always nervous about messing with electricity, but I'm glad I did. Some of the outlets and switches had no ground, and now all of them do.
That was really the goal of this part of the hallway project: make the electrical system safer and more dependable, but also make everything look as though it belonged together. The brown switches recede nicely against the aged-bronze plates, and the warm metal finishes connect naturally with the Mission-style lighting. For once, the practical work and the decorative work were moving in exactly the same direction.
Here's a shot that'll show you why working with electricity here made me nervous:

What a mess! I had to clean it all up, reorder the wires and, just for safety sake, wrapped them with electrical tape! And here's a sampling of some of the switches that were still here at 173!


Untangling the Old Three-Way Switches
The one on the left was at the top of the steps and worked the stairwell light. it was ceramic encased and the wires wrapped around from the back and screwed into the front of the switch! At the same time, the switch on the right was at the bottom of the steps. In that one, the wires screwed into the top and bottom! And I gotta tell ya' - the positioning of the wires on both were in no way analogous to a modern 3-way switch. It took me two evenings and several lost hours of sleep to figure out where each wire went on the new switches. And that was after watching several YouTube videos!
The Hallway Lights We Installed in 1998
That brings us to the lights. Check this out, less than a year after moving into 173, the first round of hallway and stairway remodel was done, and the most modern lights we could afford went in...

Those notes are from my pre-blog house journal. $80 for all three lights! Certainly there were better quality lights back in '98, but like I said - the best we could afford! The downstairs hallway light was one of these:

Remember those? Hey, back then they were in style! And by-the-way, according to the Huffington Post, some of the fashion styles of the 90's are back in style - including brass fixtures. Anyway, the new light is in and here it is!




At the local place, the chandelier was about $140. Not bad, and less than what was budgeted so - yay! I was going to pick it up the next day. But the night I found the light, I was laying in bed and thought - I wonder if this can be found for even less, so I googled the company, style name and product number. Prices came up at different sites from $125 to some $400.

See the little squirrel? Iconic of the little boogers that tease the pooch! So, there's the new lighting for the hallways! Now it's time for wrapping up little details for this project, so there should be just one more post on the hallways!


Remember those? Hey, back then they were in style! And by-the-way, according to the Huffington Post, some of the fashion styles of the 90's are back in style - including brass fixtures. Anyway, the new light is in and here it is!

Choosing Mission-Style Hallway Lighting
I've mentioned before that the woodwork here at 173 is kinda Mission style, so we decided to go with mission lighting. This light was gorgeous, but it came with a single post from the base, so requisitioned the base from one of the bedrooms because it was a much more substantial-looking base:
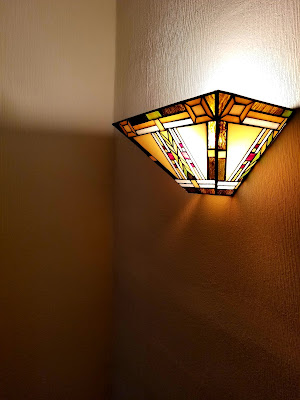
The New Upstairs Sconce
Then there was the upstairs wall sconce. Again, back in '98 the style was...

Now...and I love this...

A Prairie-Style Chandelier for the Stairwell
The Tiffany-style lighting is very representative of the Mission style and just looks fantastic at 173! But there's another lighting look for the Mission style that tends toward Prairie style and is a beautiful compliment to the Tiffany style. To keep from making 173 too cutesy-matched, the chandelier would be Mission style, but lean toward Prairie! But, before we get there, here's the '98 chandelier:

Yep! She was a beaut! But alas, times change, styles change and the chandelier changed!

I love the lines!! And now, I have to tell you, not a single one of these lights was simple to install, not even the sconce! Just how it is with old houses, but it was well worth the effort!
The $38 Chandelier Bargain
Finally, the bonus light. You see, I originally found the chandelier after days of searching. I just couldn't find the right one on Amazon, so I started looking on lighting websites...also no luck. Then I searched local lighting stores and finally found the chandelier that seemed like it would work.

At the local place, the chandelier was about $140. Not bad, and less than what was budgeted so - yay! I was going to pick it up the next day. But the night I found the light, I was laying in bed and thought - I wonder if this can be found for even less, so I googled the company, style name and product number. Prices came up at different sites from $125 to some $400.
Then I put the info into Amazon and wha-la! There it was...exact same company, product number and everything, but the price was different. $45! Yes, that's right - $45! So of course I had to buy it then and there. But when I clicked to pay, there was some other kind of Amazon discount automatically applied and the chandelier ended up costing....wait for it....$38!! Can you believe it? That's even less than the chandelier from 1998!
One More Light for the Front Hallway
I mentioned the bonus light. Because of the incredible savings, I picked up a light for the phone stand in the front hallway!

Hey, thanks for stopping by - see ya' next time!
Thirty-eight dollars.
I read that paragraph twice because I assumed I had missed a digit.
The lighting itself is handsome, especially the Prairie-style chandelier, but the price is the detail I will be telling people about. You found the fixture locally for $140, researched the manufacturer and model number, found the exact same light online for $45, and then somehow wandered into another discount. That is not shopping. That is competitive sport.
I also appreciated that the post did not treat the outlets and switches as an afterthought. The new plates look good, but discovering ungrounded devices and those strange old three-way switches makes the project feel more important than a style update.
My favorite part may be the squirrel lamp, though. After all the wiring diagrams, metal plates, chandeliers, and sleepless nights, the project ends with a tiny squirrel whose only qualification is that he annoys the dog.
Perfect House 173 logic. - A Bargain Hunter
Frequently Asked Questions
Why did you replace the hallway switches and outlets instead of only changing the cover plates?
The old switches and outlets were part of the problem, not just the covers. Some were outdated, several lacked proper grounding, and the two three-way switches controlling the stairwell light used configurations that were very different from modern devices.
Replacing the switches and receptacles allowed the electrical components to match the new brown finish, but more importantly, it gave me the opportunity to inspect the wiring, reorganize the conductors, and correct grounding issues before installing the new metal plates.
Why were the old three-way switches so difficult to replace?
A three-way circuit allows one light to be controlled from two locations. Modern three-way switches typically have a common terminal and two traveler terminals, but the old switches at House 173 did not present those connections in a familiar arrangement.
One switch had wires wrapped around from the back and fastened at the front, while the other had connections positioned at the top and bottom. The physical location of the terminals did not correspond clearly with a modern switch, so the important task was identifying the function of each conductor rather than simply copying where it had been attached on the old device.
Why choose Mission- and Prairie-style lighting for the hallway?
The existing woodwork at House 173 has a Mission influence, so lighting with strong geometric lines, warm metal finishes, and stained-glass elements felt more appropriate than generic contemporary fixtures.
The Tiffany-style sconce reinforces the Mission character, while the chandelier leans toward Prairie style. That slight variation keeps the fixtures related without making the hallway feel overly coordinated or themed.
Is it necessary for every light fixture in a hallway to match exactly?
No. Fixtures can coordinate through finish, proportion, shape, or historical influence without being identical. In this project, the fixtures share warm tones and Arts and Crafts-era design language, but they are not part of one perfectly matched collection.
That approach works especially well in an older house, where a little variation can make the rooms feel as though they evolved over time rather than being furnished from a single catalog page.
What should homeowners consider before replacing old switches or light fixtures?
The first step is understanding the circuit and confirming that power is off before any work begins. Older homes may contain ungrounded boxes, unusual switch arrangements, brittle insulation, crowded wiring, or previous modifications that do not match current expectations.
A straightforward replacement can become complicated quickly when wire functions are unclear. If the wiring cannot be positively identified, appears damaged, or does not match the expected circuit, bringing in a licensed electrician is safer than relying on trial and error.
Keywords
hallway lighting update, Mission style lighting, Prairie style chandelier, old house electrical update, replacing three-way switches, grounded outlets, AmerTac Imperial Bead, aged bronze switch plates, Tiffany style wall sconce, hallway chandelier, House 173 hallways


Comments
Post a Comment